Do you know how to optimize your gaming PC under Windows 10/11 for a better gaming experience?
Whether you are a casual or die-hard gamer, keeping your computer in top shape must be a priority for you because only then will your favorite games work exactly the way you want.
You have a newer and more powerful computer, but you have noticed that the system has started to slow down sharply after a while. The reasons for the slowdown are sometimes difficult to identify immediately.
In this guide, I want to give you some essential tips, for hardware and software, on keeping your PC running at its maximum.
Table of Contents
1. Optimize PC for gaming under Windows 10
OS selection
Almost every new PC comes with a pre-installed Windows 10 or 11 operating system. In addition to Windows OS, you can also have an alternative in the form of a Linux OS distribution (Ubuntu, etc.).
I will still recommend Windows OS to gamers because of the enormous driver base, great support, and many supported games. So, the slightest chance of getting into an OS problem is with Windows, especially for a beginner.
As for the Windows OS, I recommend Windows 10 over Windows 8 or Windows 7. Windows 7 is already an older OS, which no longer even has official support from MS. Although it seems faster than Windows 10, it doesn’t support advanced gaming features like DirectX 12. Skip Windows 8 because it’s a transition from Windows 7 to Windows 10.
So for gaming, we need to have the latest OS, which’s for most Windows 10 users in version 21H2 or Windows 11.
OS update
The first step is to check what version of your operating system is, and if you are stuck on an older version like 1903, you need to update your system.
Be sure to set Windows 10 to update your system regularly. When the system is up to date, you will have fewer security and system vulnerabilities and compatibility with the latest games.
Disable Windows automatic update
Unfortunately, although the auto-update option is beneficial for your OS, it can interfere with you during a gaming session by unpleasantly slowing down your internet connection. Sometimes the system is reset without prior notice to complete the update process.
Fortunately, you can delay the update as follows;
1. Right-click on the Windows logo in the left corner of the screen and select Settings.
2. Choose Update & Security and then Advanced Options.
3. Disable Automatic Update as shown in the figure below
Use Active Hours for gaming
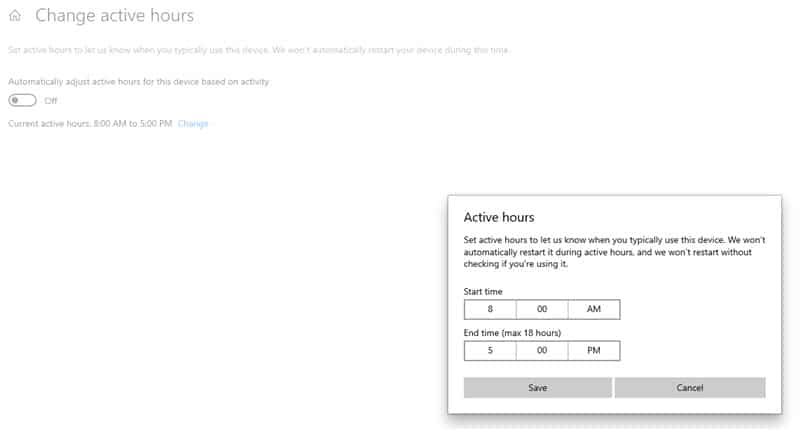
Active hours are when you use your computer often, so use this option to tell Windows 10 not to bother with an update or automatic reset. This option is the best way to solve the problem that automatic updating interferes with gaming and slows down network performance. Windows will make the necessary updates when you aren’t using a PC for gaming, not bothering you.
To set Active Hours for gaming, do the following:
1. Right-click on the Windows logo in the left corner of the screen and select Settings.
2. Choose Update & Security and then Advanced Options.
3. Change Active hours according to your wishes, that is, the time in which the Windows update will not disturb you while you are gaming.
Disable Delivery Optimization
Delivery optimization is another option closely related to the update process and can degrade network performance. Windows 10 constantly exchange data with Microsoft (MS) servers for update purposes. In addition to the necessary, we can reduce unnecessary data exchange, mainly if we have limited internet data.
Delivery Optimization is an MS concept that your network uses to update other unknown computers. This feature means that the OS uses updates downloaded to your computer to update another anonymous computer to reduce network load or bandwidth. You can immediately see that this MS trick of saving internet bandwidth is unfavorable for gamers.
No gamer wants his network to be used for such things and affect the quality and speed of his online gaming session.
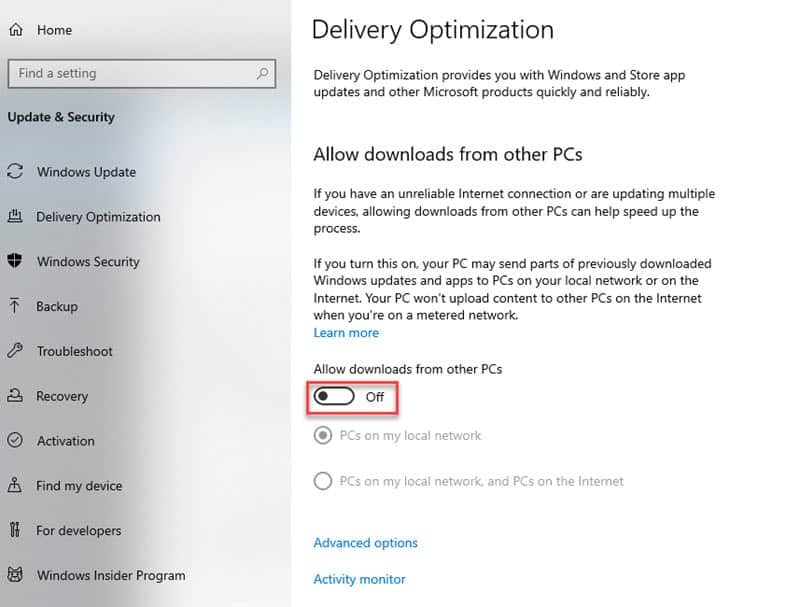
Here’s how to disable Delivery Optimization;
1. Right-click on the Windows logo in the left corner of the screen and select Settings.
2. Choose Update & Security and then Delivery Optimization.
Disable startup programs
In the Start Menu, you overview all the installed programs, even those you installed out of curiosity and left to use sometimes and maybe never again. If there are a dozen or more such programs, there’s a good chance that some of them will start when you start your PC.
Here’s how to disable startup programs;
1. Right-click on the Windows logo in the left corner of the screen and select Task Manager
2. Task Manager window will open. Select the Startup tab, and there you will find a list of all programs that aren’t necessary for the Windows OS to work usually but run every time you start your computer.
3. In the Startup list, you will probably recognize all the programs that run together with the OS and disable them here if you wish.
Of course, programs on the Startup list will usually work when you launch them via the Start menu or a desktop shortcut. Disabling via the Startup list means that programs don’t have to be loaded into RAM every time you start the OS, so they unnecessarily take up extra resources.
If you are even more rigorous and estimate that you don’t need some of these programs – delete them from the disk. This simple procedure can significantly speed up the startup of your OS, so I recommend not skipping it in Windows 10 optimization.
Disable startup services
In addition to the programs in the Startup section, there are background services that run on Windows OS. These services, which come from your installed programs, also boot from the OS and unnecessarily eat up system resources and slow down the entire system.
To turn off unnecessary service, do the following;
1. Press the Windows + R keys, and the Run window will open.
2. Type msconfig and press Enter.
3. It opens the System Configuration window.
4. On the Services tab, enable (check) the Hide all Microsoft services. Thus, it will hide all system services and show only the services of the programs you have installed (third-party services).
5. Uncheck any services you don’t need and prevent them from running on Windows OS.
6. Finally, confirm the changes to Apply and OK.
Delete unnecessary programs
On your computer, no matter if it’s new or you have been using it for a long time, there is always a surplus of programs that you rarely or never run. These programs take up disk space and can also run as background processes that are pretty detrimental to the overall performance of your computer.
You can regulate the start of processes and services of these programs through the Task Manager and Disable startup services, but it’s best to delete that programs permanently if you don’t use them often or not at all.
How to delete unnecessary programs;
1. Press Windows + R to open the Run window
2. Type the command appwiz.cpl in the Run window
3. The Programs and Features window opens.
4. Select the program you want to delete from the list and click Uninstall.
Delete temporary files
Windows OS has a Temp system folder that houses temporary files created when browsing the Internet and installing programs and games. Usually, these are unnecessary files that can only slow down your OS and, therefore, gaming, so I recommend that you regularly delete the contents of the Temp folder.
You can delete the contents of the temp folder as follows;
1. Press Windows + R to open the Run window
2. Type the command %temp% in the Run window
3. The Temp window opens when you click on the Select all button (or keys Ctrl + A)
4. Press the Delete button (or keys Ctrl + D), and you will empty the Temp folder contents.
If some files remain that you cannot delete as described, the OS or some programs are currently using them, and don’t try to delete those files by force. Leave them and close the temp folder.
Optimize Power Options
Choosing the right power option is essential for the proper operation of your computer in terms of performance and energy savings. Since real gamers want to squeeze every atom of computer power for maximum performance, saving energy isn’t in the foreground.
Microsoft offers several power profiles that it has optimized for different computer purposes.
To apply the appropriate profile, do the following:
1. Right-click on the Windows logo in the left corner of the screen and select Power Options
2. Depending on Windows 10, select the Ultimate performance or High performance option.
Enable Game mode
Microsoft has also built into the Windows 10 one simple but practical option called Game Mode. When Game Mode is on, Windows gives priority to system resources for your games. The game you are currently playing will get more GPU and CPU resources, while other applications and background processes have lower priority and thus get fewer resources.
Also, game mode prevents your system from resetting in the middle of a game ( due to an automatic Windows update).
To turn on the game mode, do the following:
1. Right-click on the Windows logo in the left corner of the screen and select Settings
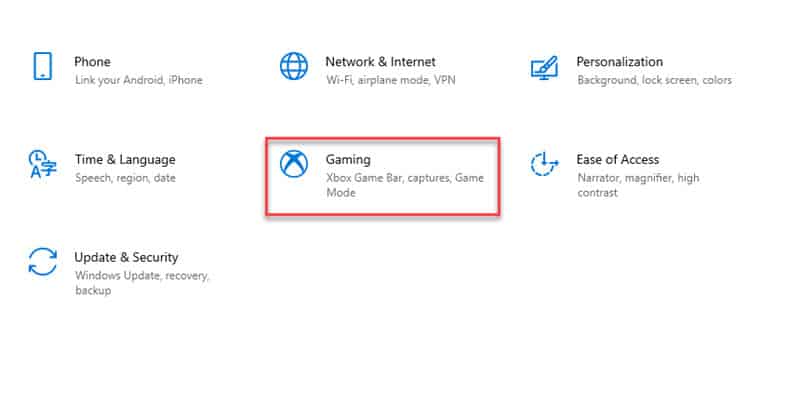
2. Chose the Gaming option from the Settings menu
3. And finally, turn on Gaming Mode
Disable visual effects
Windows 10 comes with a visually appealing user interface. But be aware that overdoing too much makeup eats up your system resources and negatively affects gaming performance. The best option for all gamers is to turn off the visual effects because you spend the least time unnecessarily beautifying the user environment.
To turn off visual effects, do the following:
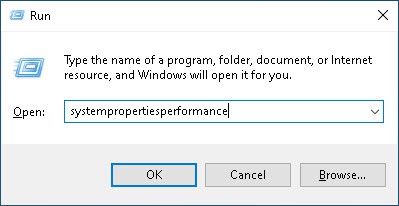
1. Press the Windows + R keys, and the Run window will open.
2. Type systempropertiesperformance and press Enter.
3. The Performance Options window opens
4. Check the Adjust for best performance button for Windows 10 without visual effects to beautify the user interface.
5. With the Custom option, you can choose the visual settings, so wisely choose the ones without which you can’t imagine the Windows interface, but don’t overdo it.
Disable Steam auto-update of games
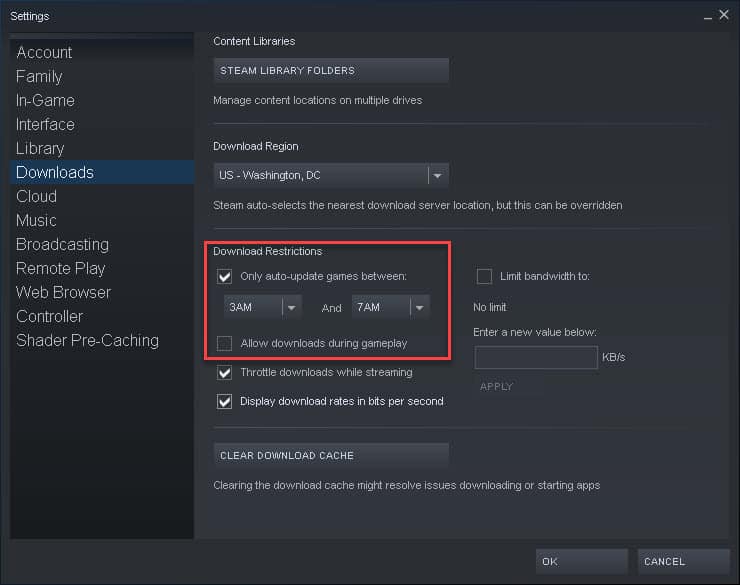
Every good gamer who plays on Windows OS also has access to Steam as one of the largest distributors of games in the online format. Steam behaves similarly to Windows updates because it constantly runs in the background and updates downloaded games on your computer.
Unfortunately, Steam doesn’t allow you to turn off automatic updates in all your games, which can seriously impair network performance during online gaming. However, there is a way to set up Steam to update your games when you specify.
Set up the Steam update as follows;
1. Open your Steam account and select Settings.
2. In Settings, go to the Downloads option.
3. Under Download Restrictions, select the time when Steam will update your games without disturbing you during the time you are gaming.
4. Also, turn off the option Allow downloads during gameplay
Disable mouse acceleration
Windows has a feature that controls the movements of your mouse. Enhance Pointer Precision is a type of mouse acceleration. If you turn on this option, Windows 10 tracks how fast you move the mouse on the surface and adjusts DPI on the go.
If you are a gamer, I recommend you turn off this option because it doesn’t have a linear increase in accuracy across the entire surface, i.e., it will hardly be completely accurate. Mouse acceleration is quite inconvenient for FPS, so turn off this option.
To disable mouse acceleration, do the following;
1. Press Windows + R to open the Run window
2. Type the command main.cpl in the Run window
3. The Mouse properties window opens in which you select the Pointer Options tab
4. Turn off (uncheck) the Enhance pointer precision
Get the latest drivers
While Windows Update will download almost all the necessary drivers to keep the OS running smoothly, that’s not enough for gamers. It would be best always to have the latest non-generic drivers for your graphics card and other hardware (motherboard, sound card, network card).
Whether your computer is new or used for a long time, the new drivers will give you excellent compatibility with new games, especially graphics card drivers.
2. Hardware Optimization
RAM upgrade
Two effective ways to speed up your Windows OS, and gaming in general, are to upgrade memory (RAM) and a faster disk. It’s no secret that your gaming system will run much quicker if it has enough RAM. If your Windows OS takes up over 40% of the total RAM, it’s time to upgrade.
But how much RAM is enough for enjoyable gaming?
The minimum memory for an entry-level gaming computer is 8GB. If you have 8GB of RAM in a single memory module in the motherboard, I recommend getting another module of the same model, speed, and specification to work in dual-channel mode.
With 16GB of RAM in dual-channel mode, you will feel a big difference in the system’s operation, and that amount of RAM is undoubtedly optimum for a modern gaming computer.
Storage upgrade
Another thing is the disks for the gaming computer. You can choose a classic hard drive (HDD), a SATA SSD, or an M.2 NVMe PCIe SSD. Use the HDD to store your essential data securely, such as photos, videos, copyrighted files, etc., where the speed of working with those files isn’t so important.
We usually use SSD and M.2 NVMe as the primary disk on which the Windows OS is located, with frequently used applications and your games. If your motherboard has an M.2 slot, I recommend getting an NVMe PCIe SSD, as it’s much faster than a classic SATA III SSD.
When we talk about capacity, a minimum of 500GB is desirable if it’s an SSD.
Overclocking
Overclocking (OC) is the cheapest way to increase system performance, but I don’t recommend it if you’re unsure what you’re doing. Overclock (OC) is undoubtedly one of the more popular ways to increase the overall performance of gaming systems, especially popular with PC enthusiasts. Of course, OC has been around lately and is no longer a taboo topic that belongs to some tech-geek characters out there, but it has also given beginners a chance to play around with OC settings.
What can we overclock?
First of all, we can overclock the graphics card, the processor, and RAM. Overclocking graphics cards is perhaps the simplest because if you get a little carried away and overdo it, the worst that can happen is that your system doesn’t boot up or shut down.
For each graphics card model on the Internet, you can find the optimal settings, i.e., what you can expect from your graphics processor to work stably. MSI has made the most popular tool for OC and is called MSI Afterburner.
If running OC on newer NVIDIA graphics cards, Afterburner can overclock your graphics card and set maximum stable limits (clocks) for the graphics chip and video memory. This procedure will undoubtedly increase the fan speed on the graphics card, so get into the OC if you are ready for more noise.
AMD cards can also be OC from MSI Afterburner, although you can also do this from AMD software, an integral part of the AMD Adrenaline drivers. However, if you’re unsure how to do this, don’t try OC. Most new graphics cards are fast enough so that you won’t feel a big jump in performance due to extreme OC.
CPU overclock
You can do the OC of the processor (CPU) with Intel and AMD models.
It would be best if you had the following prerequisites for CPU OC:
- A quality motherboard with passive heatsinks around the processor.
- Excellent aftermarket cooler on the processor (for air or water cooling).
- Airy case with plenty of fans.
Higher quality motherboards can set OC profiles in the BIOS, so this process is quite simplified. Intel processors with OC capability have a K suffix at the end of the label, such as the Core i5 11600K.
If you want to “manually” do the OC of an Intel processor with a K mark, it’s enough to change only the multiplier in the BIOS and leave everything else in the “Auto” settings. AMD processors also have OC capability but keep in mind that by doing so, you lose turbo performance that will be hard to achieve via OC. This OC deficiency is especially true of the new Ryzen processors.
So, when we add and subtract everything, OC is an exciting way to achieve slightly better system performance, but I still recommend safer and more stable methods.
Conclusion
As you can read, various methods can speed up your system to the point that you feel a significant difference in gaming performance. It’s vital to maintain your OS by regularly updating it, cleaning unnecessary files, uninstalling unused programs, etc. Also, update all important drivers regularly, especially for your graphics card.
As important as keeping your OS in top condition, pay attention to installing sufficient RAM and a fast SSD. This way, you will generally contribute to the most significant jump in performance.
Lastly, if you have any questions or suggestions, don’t hesitate to leave a comment.


